
Help Center / Teams & Organizations
Teams & Organizations
An organization is a group of traders under one roof. One subscription covers every seat, desks group traders, org workspaces roll results up for managers, and oversight views stay read-only. A prop firm, a trading family, or two friends holding each other accountable all work the same way. Your personal workspaces and your journal stay private throughout.
What an organization is
An organization bundles three things:
- One subscription for everyone. The group buys Ascent or Summit per seat, and every member gets that tier. Nobody needs an individual plan.
- Shared visibility where you choose it. Work recorded in an ORG workspace is visible to the organization's managers. Personal workspaces never are, and journals stay private even inside org workspaces.
- Structure. Members, roles, and desks (sub-teams), with oversight rollups and analytics that follow that structure.
There are two kinds, and they behave almost identically. A Company organization (badged ORG) has desks and the full oversight structure. A Team (personal) group (badged TEAM) is the lightweight version for families and small groups: same per-seat subscription and member management, no desks.
Creating an organization
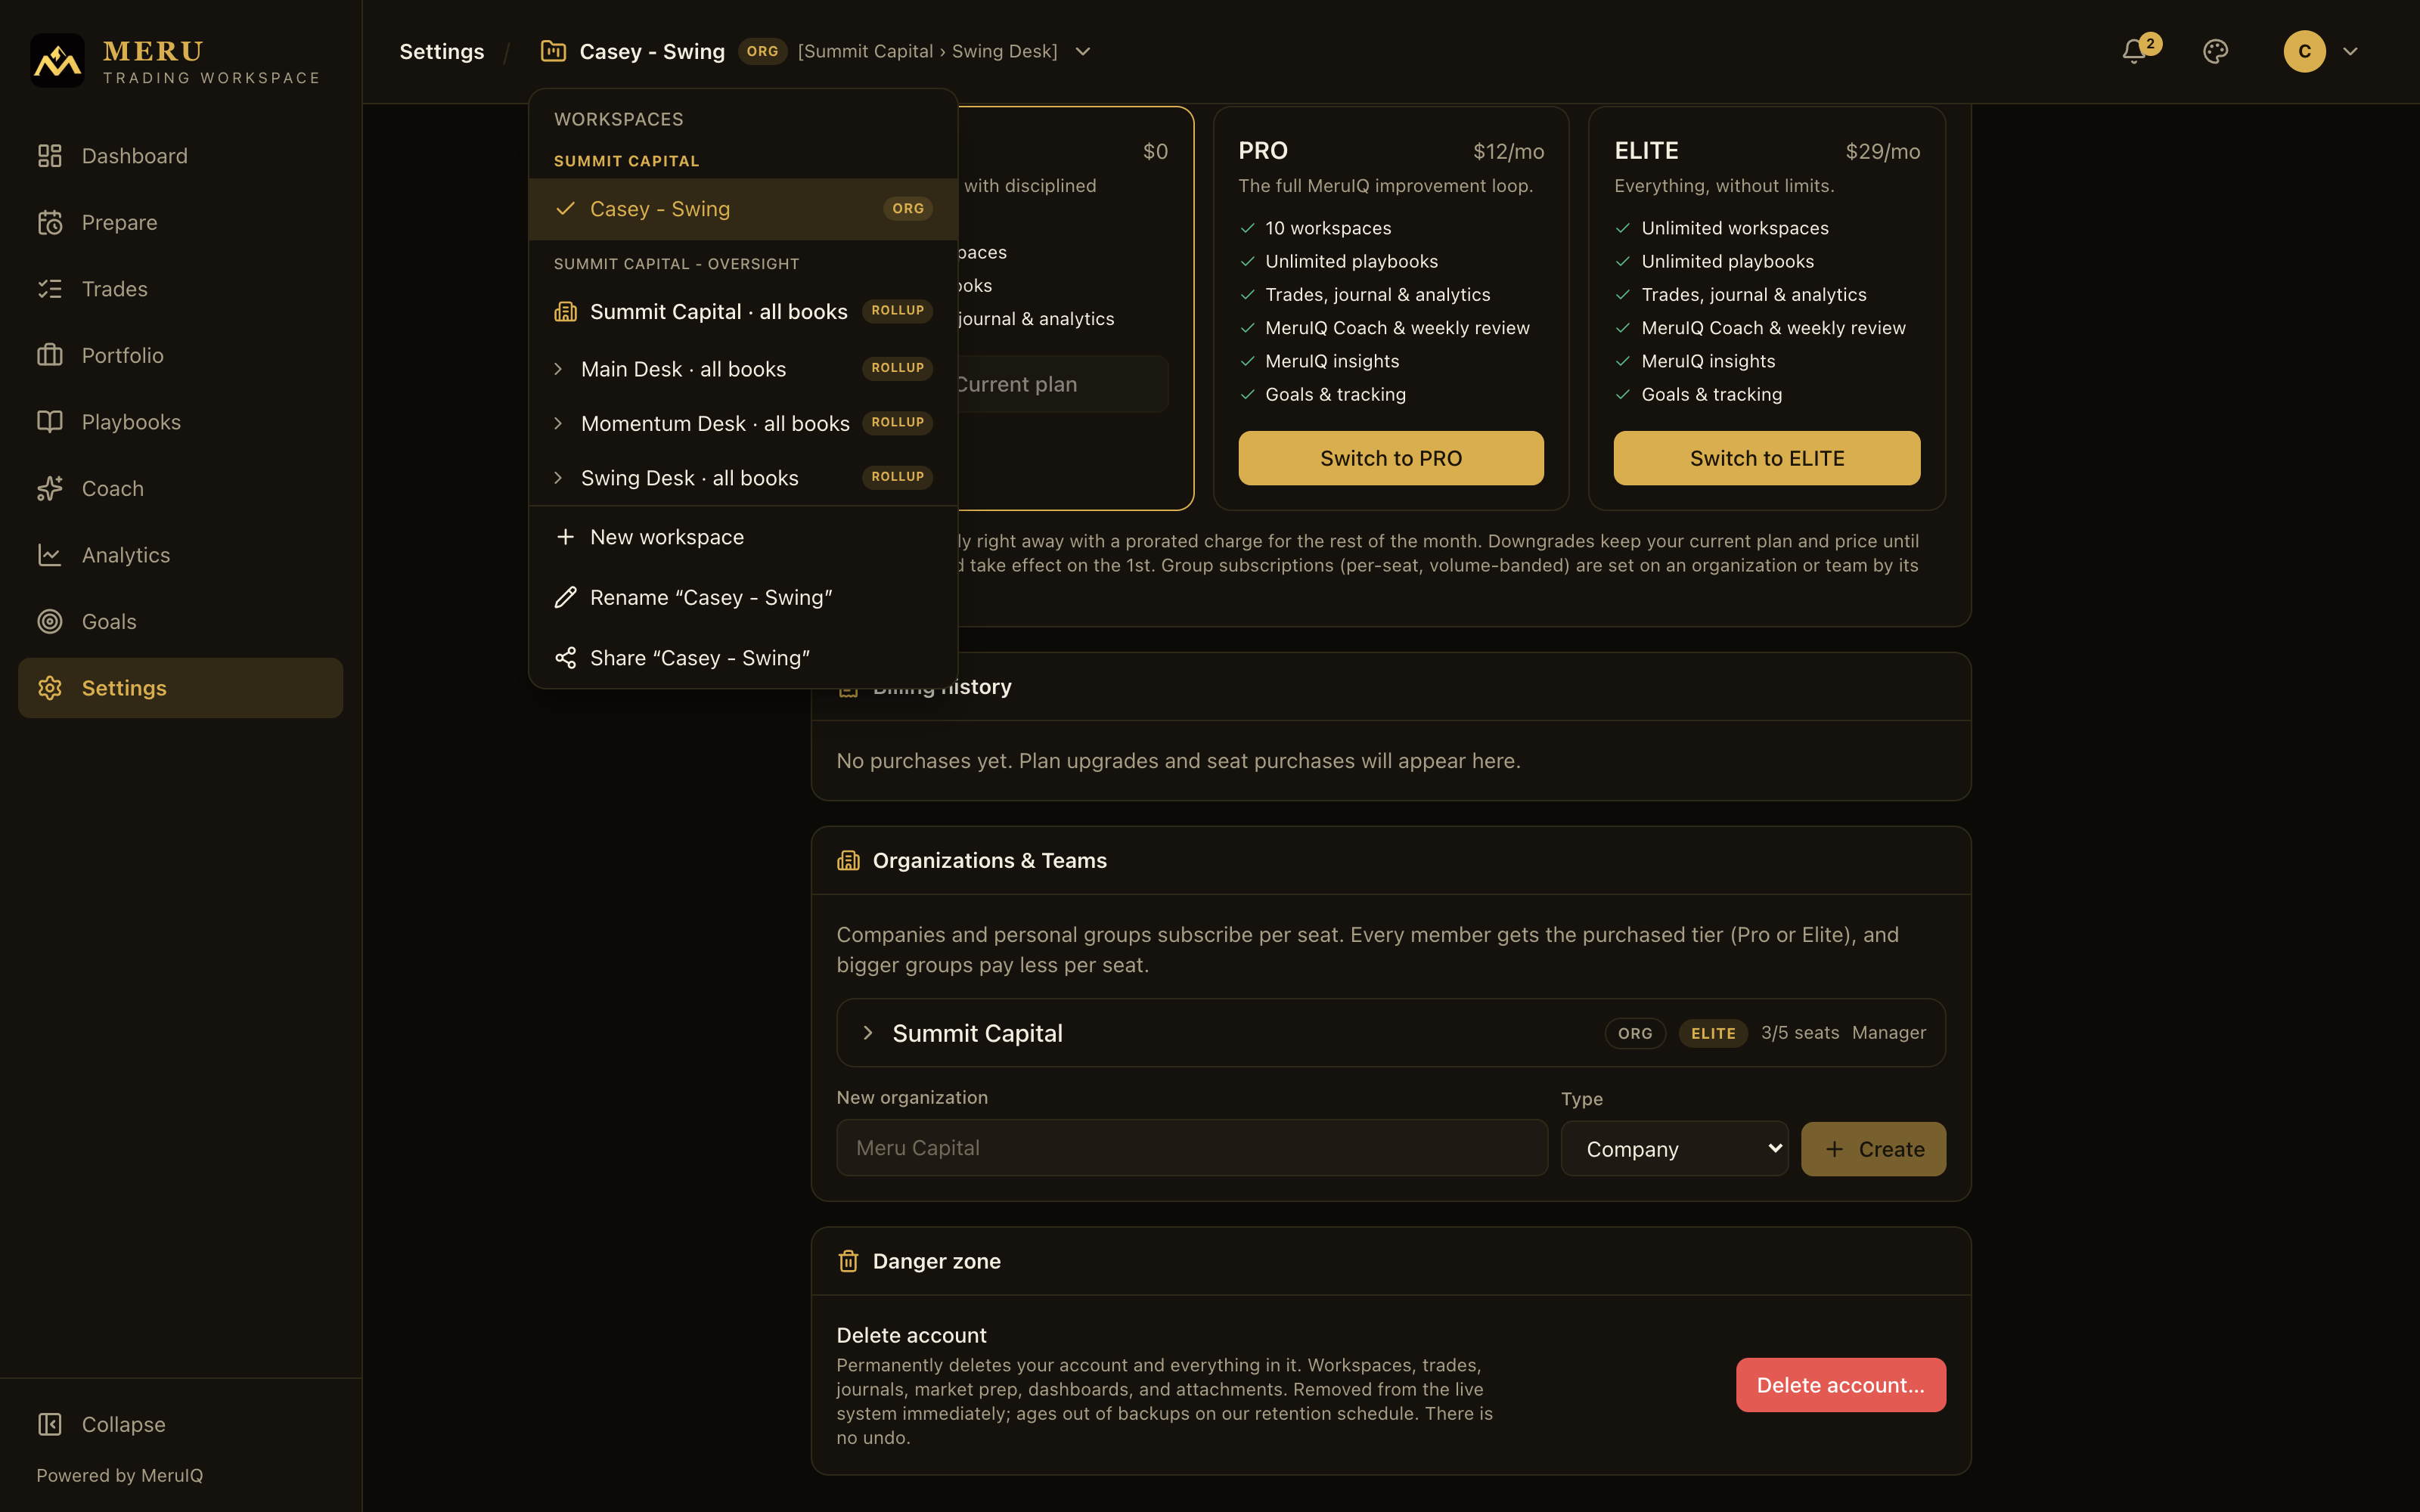
Organizations live at the bottom of the Settings page, in the Organizations & Teams card.
- Open Settings and scroll to Organizations & Teams.
- Type a name in the New organization field.
- Pick the Type: Company or Team (personal). Choosing Team relabels the name field to New team.
- Click Create. The new organization appears in the card, expanded, with you as its Admin.
Each organization is a collapsible row showing its name, an ORG or TEAM badge, the plan badge and seat usage (for example 3/5 seats) once subscribed, and your role. Expand the row to manage everything below.
The per-seat subscription
Admins see an Organization plan & seats section (or Team plan & seats) inside the expanded row:
- Pick the tier: Ascent or Summit. Every member gets the selected tier; each tier card lists its per-seat price bands.
- Choose the billing interval with the Monthly / Annual toggle. Annual costs ten months per seat for a full year, two months free, and the button switches to the per-year total.
- Enter the number of Seats. Seats cover members plus pending invites, so the field will not go below what you are already using.
- Click the purchase button. It always states exactly what will happen, for example Purchase - $120.00 USD/mo for a new subscription or Upgrade now with the prorated amount and the new price per period. An organization's first purchase hands the admin to a secure checkout page hosted by our payment provider to enter the card; the plan activates as soon as the payment completes, and later changes happen in the card itself. A Manage billing button next to the plan opens the same hosted page for cards, invoices and receipts.
Pricing is volume banded: group plans start at 2 seats, the per-seat price drops at 10+ seats and again at 25+ seats, and the tier cards show the exact band prices (for example 2+ seats $10.00 · 10+ seats $9.00 · 25+ seats $8.00). The whole seat count is billed at the band it lands in; on annual billing the same band price simply multiplies by ten months. For one person, the individual plan is the right purchase, and the server says so if you try to buy a single seat.
Members, invitations, and roles
The Members section lists everyone in the organization with their name, email, and role.
Inviting someone
- Type their email in the invite field and click Invite.
- The address appears in the member list marked invited until they respond. Click Revoke to withdraw a pending invitation.
- The invitee sees the invitation in their own Organizations & Teams card, under Invitations for you, with Accept and Decline buttons. Accepting joins the organization on the spot.
Roles
Each member has one of three organization roles, editable in place from the dropdown next to their name:
- Admin: everything, including the subscription. Billing is admin-only.
- Manager: manages members and desks, and gets oversight across the organization, but cannot touch billing.
- Member: a trader in the group with no management rights.
An organization always keeps at least one Admin; the server refuses a role change that would leave it without one.
Leaving and removing
Your own row has a Leave button; admins see Remove on everyone else's. Both ask for confirmation, and the leaver is warned they lose any plan tier the organization grants them. Removal also takes the person off every desk. Their org workspaces and trades stay with the organization.
Stranded positions and former members
Two housekeeping sections appear for admins and managers of a Company organization:
- Stranded positions appears only when someone who left (or moved off a desk) still has open trades in an org book they can no longer write to. Each row links to the trade so a manager can close or correct it on the trader's behalf.
- Former members is a collapsed list of people who left or were removed, with the role and desks they had and when they departed. Click Re-invite to send a fresh invitation; accepting restores their previous role and desk memberships.
Desks
Company organizations can split into desks, sub-teams like a momentum desk and a swing desk. The Desks section lists each desk with its manager named right on the row (or a No manager warning).
- Type a name into New desk name and click Create desk.
- Expand a desk and add org members to it by email with Add.
- Set each desk member's role with the dropdown: Manager or Member. A desk manager gets oversight over that desk's books without needing an org-wide role.
- Use Leave on your own row or Remove on others to change desk membership. Leaving a desk does not affect organization membership.
Below that, the Org workspaces section lists your own workspaces in this organization along with their desk assignment. Admins and managers can move a book to a different desk with the dropdown on its row; desk placement decides whose oversight the book falls under.
Org workspaces vs personal workspaces
Every workspace lives in exactly one place: your personal space or one organization. You choose when you create it:
- Open the workspace switcher in the header and click New workspace.
- Enter a Name.
- Under Where, pick Personal or one of your organizations.
- For an organization, pick the Desk the book belongs to (the first desk is preselected). Every org book belongs to a desk.
- Click Save.
Org workspaces carry an ORG badge everywhere, and the header shows the scope next to the name, for example [Summit Capital › Swing Desk]. Personal workspaces carry a Personal badge. The location is the privacy rule: managers can see trading results in org books, and can never see your personal books. Your journal entries stay private in both.
Sharing a workbook
Independent of organization structure, you can share any workspace you own person to person. Open the workspace switcher and choose Share (the menu item names the active book, for example Share "Casey - Swing").
- Under Share with, pick Person, Desk, or Organization.
- For a person, enter their Email (they need a Workspace account). For a desk or organization, pick it from the list; everyone in it gets the access.
- Pick the Access level:
- Viewer: read-only. They can open the book and see its trades and analytics, and change nothing.
- Editor: can log, edit, close, and import trades in the book. The trades still belong to the book's owner, and the owner's journal stays private.
- Manager: everything an Editor can do, plus manage the book's sharing.
- Click Share. The Who has access list below shows you as owner plus every grant, each with a Revoke button.
- On a book that belongs to a desk, someone who is not on that desk can only be given Viewer. An Editor or Manager grant drops to Viewer on its own the moment the person leaves the desk or the organization.
Books shared with you appear in your workspace switcher with their access level next to the name. Owners and Manager grantees see the Share menu item; others do not.
Oversight: rollups in the workspace switcher
If you are an org admin, org manager, or desk manager, the workspace switcher grows an oversight section under your own workspaces, headed with the organization's name (for example SUMMIT CAPITAL - OVERSIGHT):
- An organization-wide entry, Summit Capital · all books, badged ROLLUP: every org book aggregated into one read-only view (org admins and managers only).
- One ROLLUP entry per desk, for example Swing Desk · all books. Expand a desk with its chevron to list the individual books inside, each badged VIEW with the trader's name.
- A RECENT list of the oversight scopes you visited last, and a search box (Find book, trader, desk…) once the tree grows past eight entries.
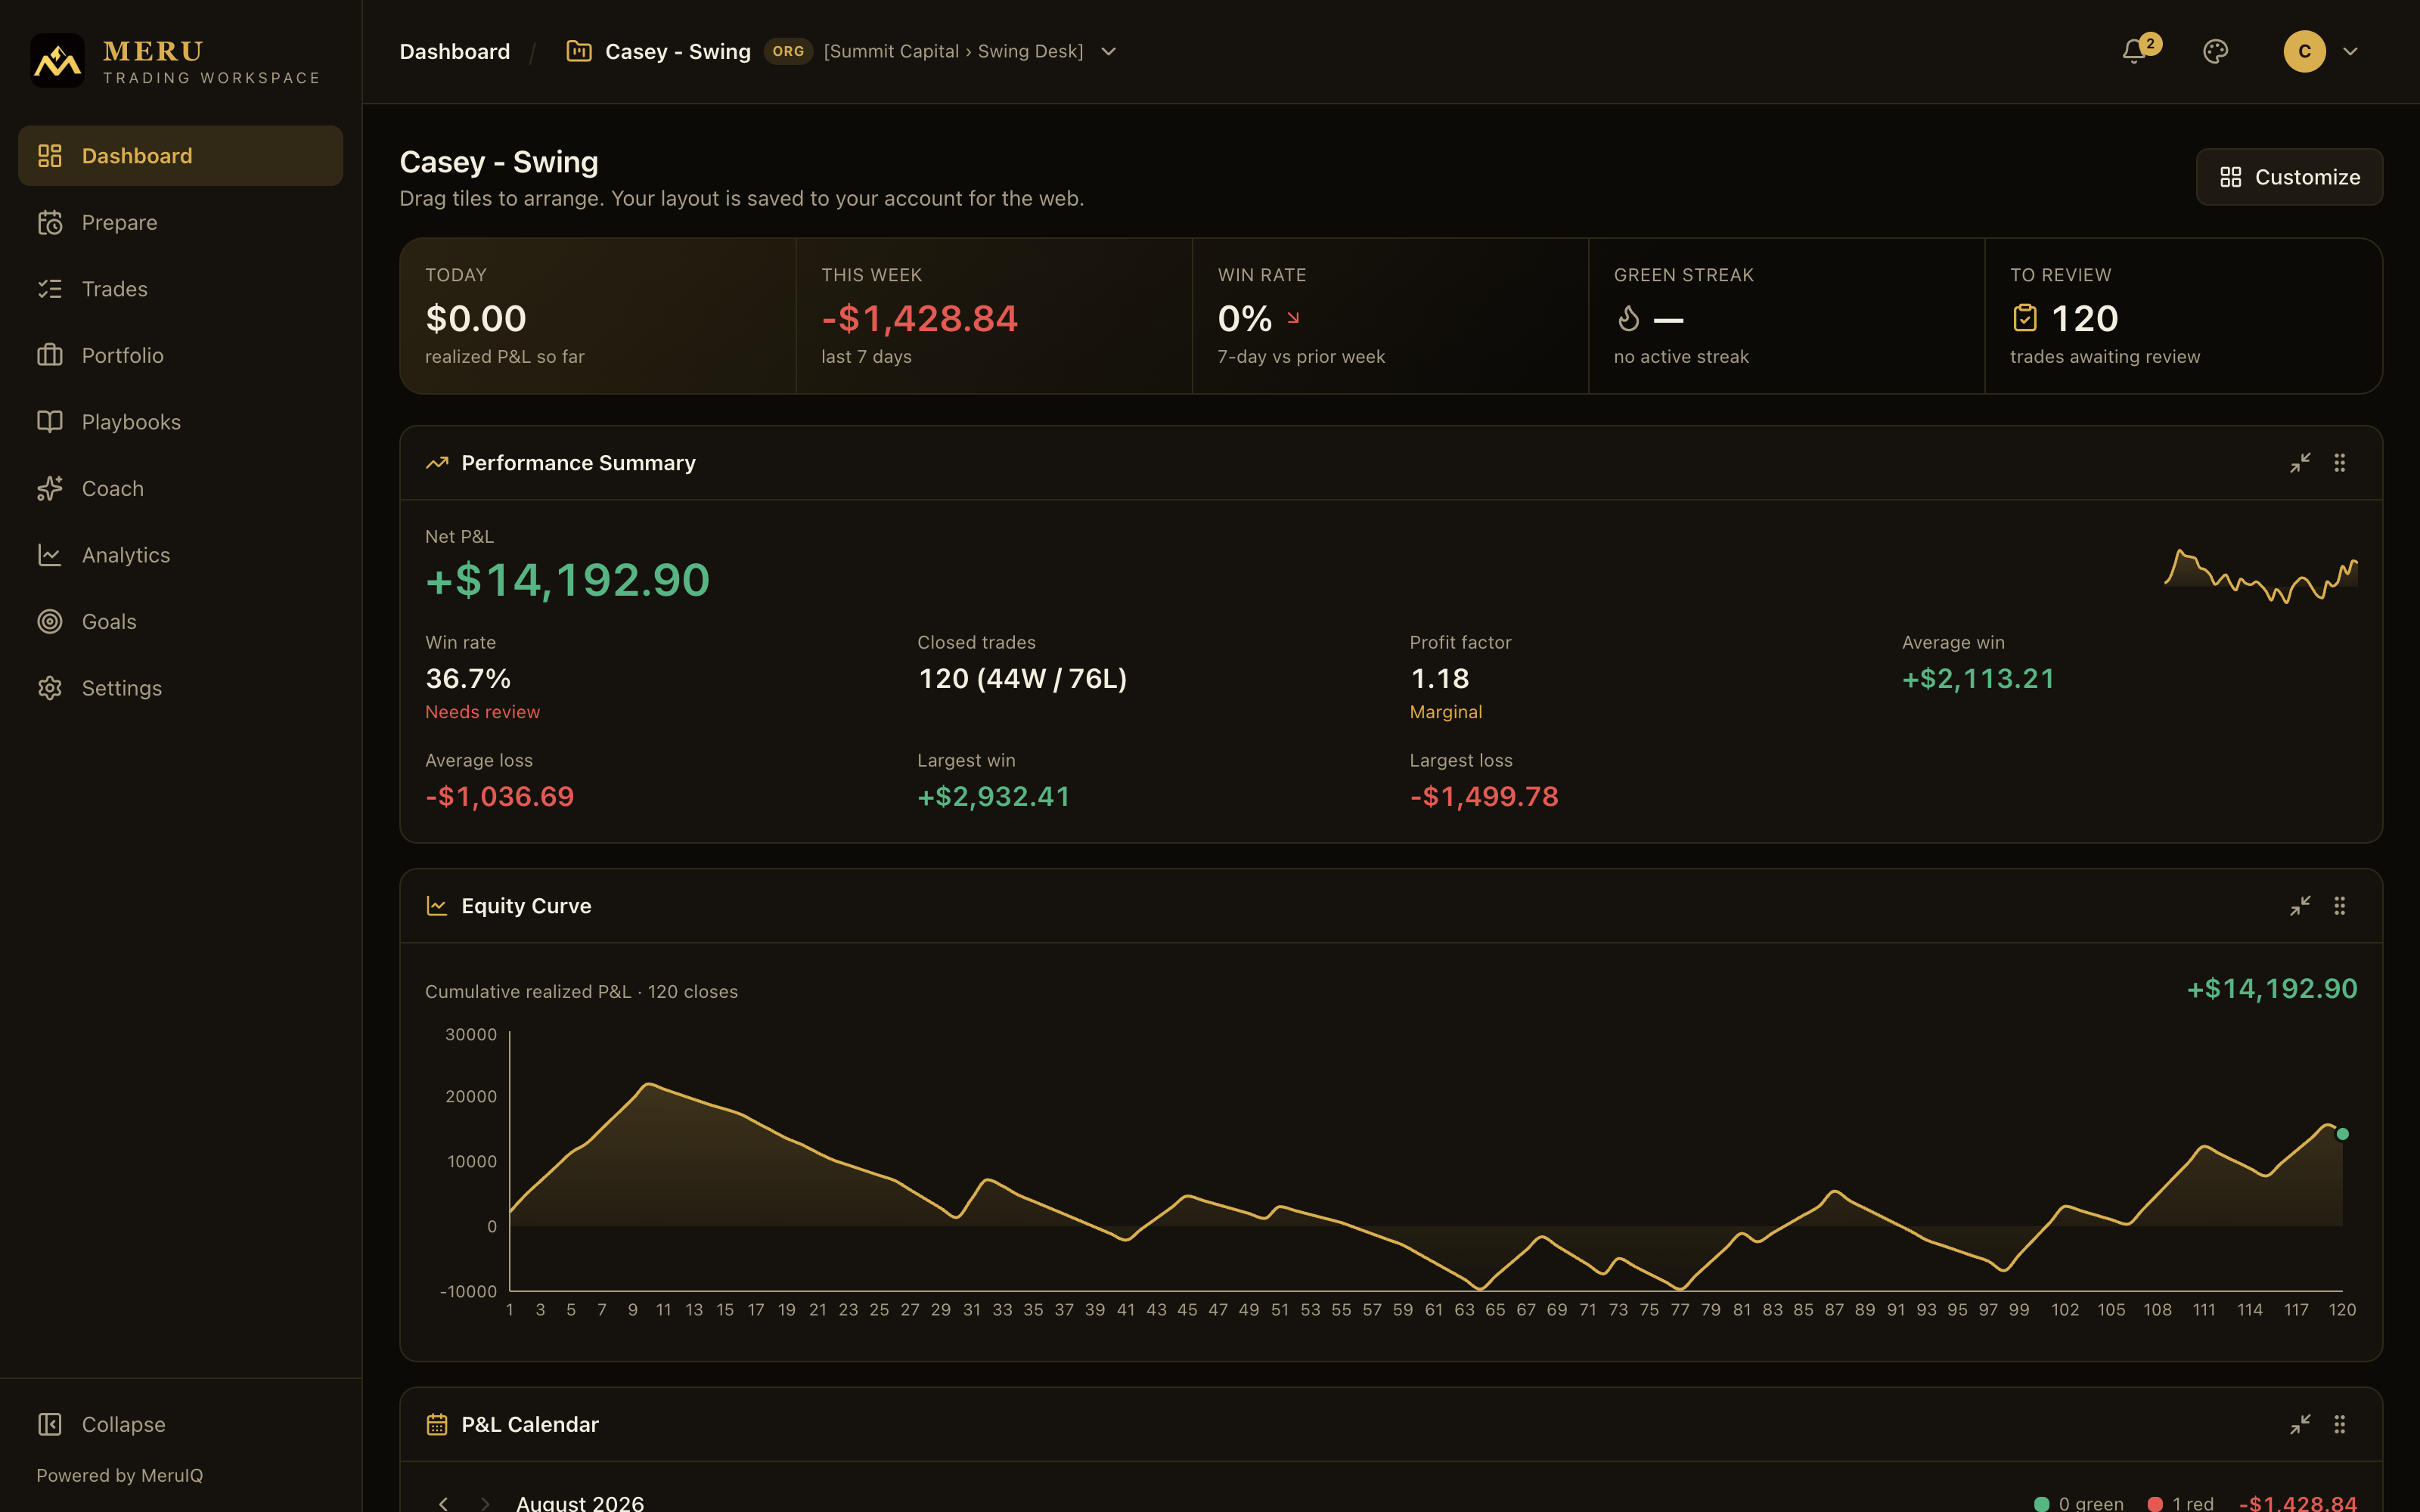
Selecting a rollup turns the whole app into an aggregated read-only view across that scope's books: the dashboard, trades, and analytics show combined results. Selecting a single VIEW book shows that trader's book. Either way:
- A banner rides along at the top of every page: for rollups, Rollup oversight view, aggregated results across the scope's books. Read-only.; for a single book, a reminder that the trader's journal and playbooks stay private.
- The header shows a clickable breadcrumb, Org › Desk › Book, so you can hop up a level.
- Nothing is editable, and journals and playbooks are never shown. Oversight is trading results only.
Org analytics
For a tabular management view, expand the organization in Settings and click Org analytics - rollup across workspaces. The page is available to organization admins and managers (badged WHOLE ORGANIZATION) and to desk managers (badged YOUR DESKS, limited to their desks).
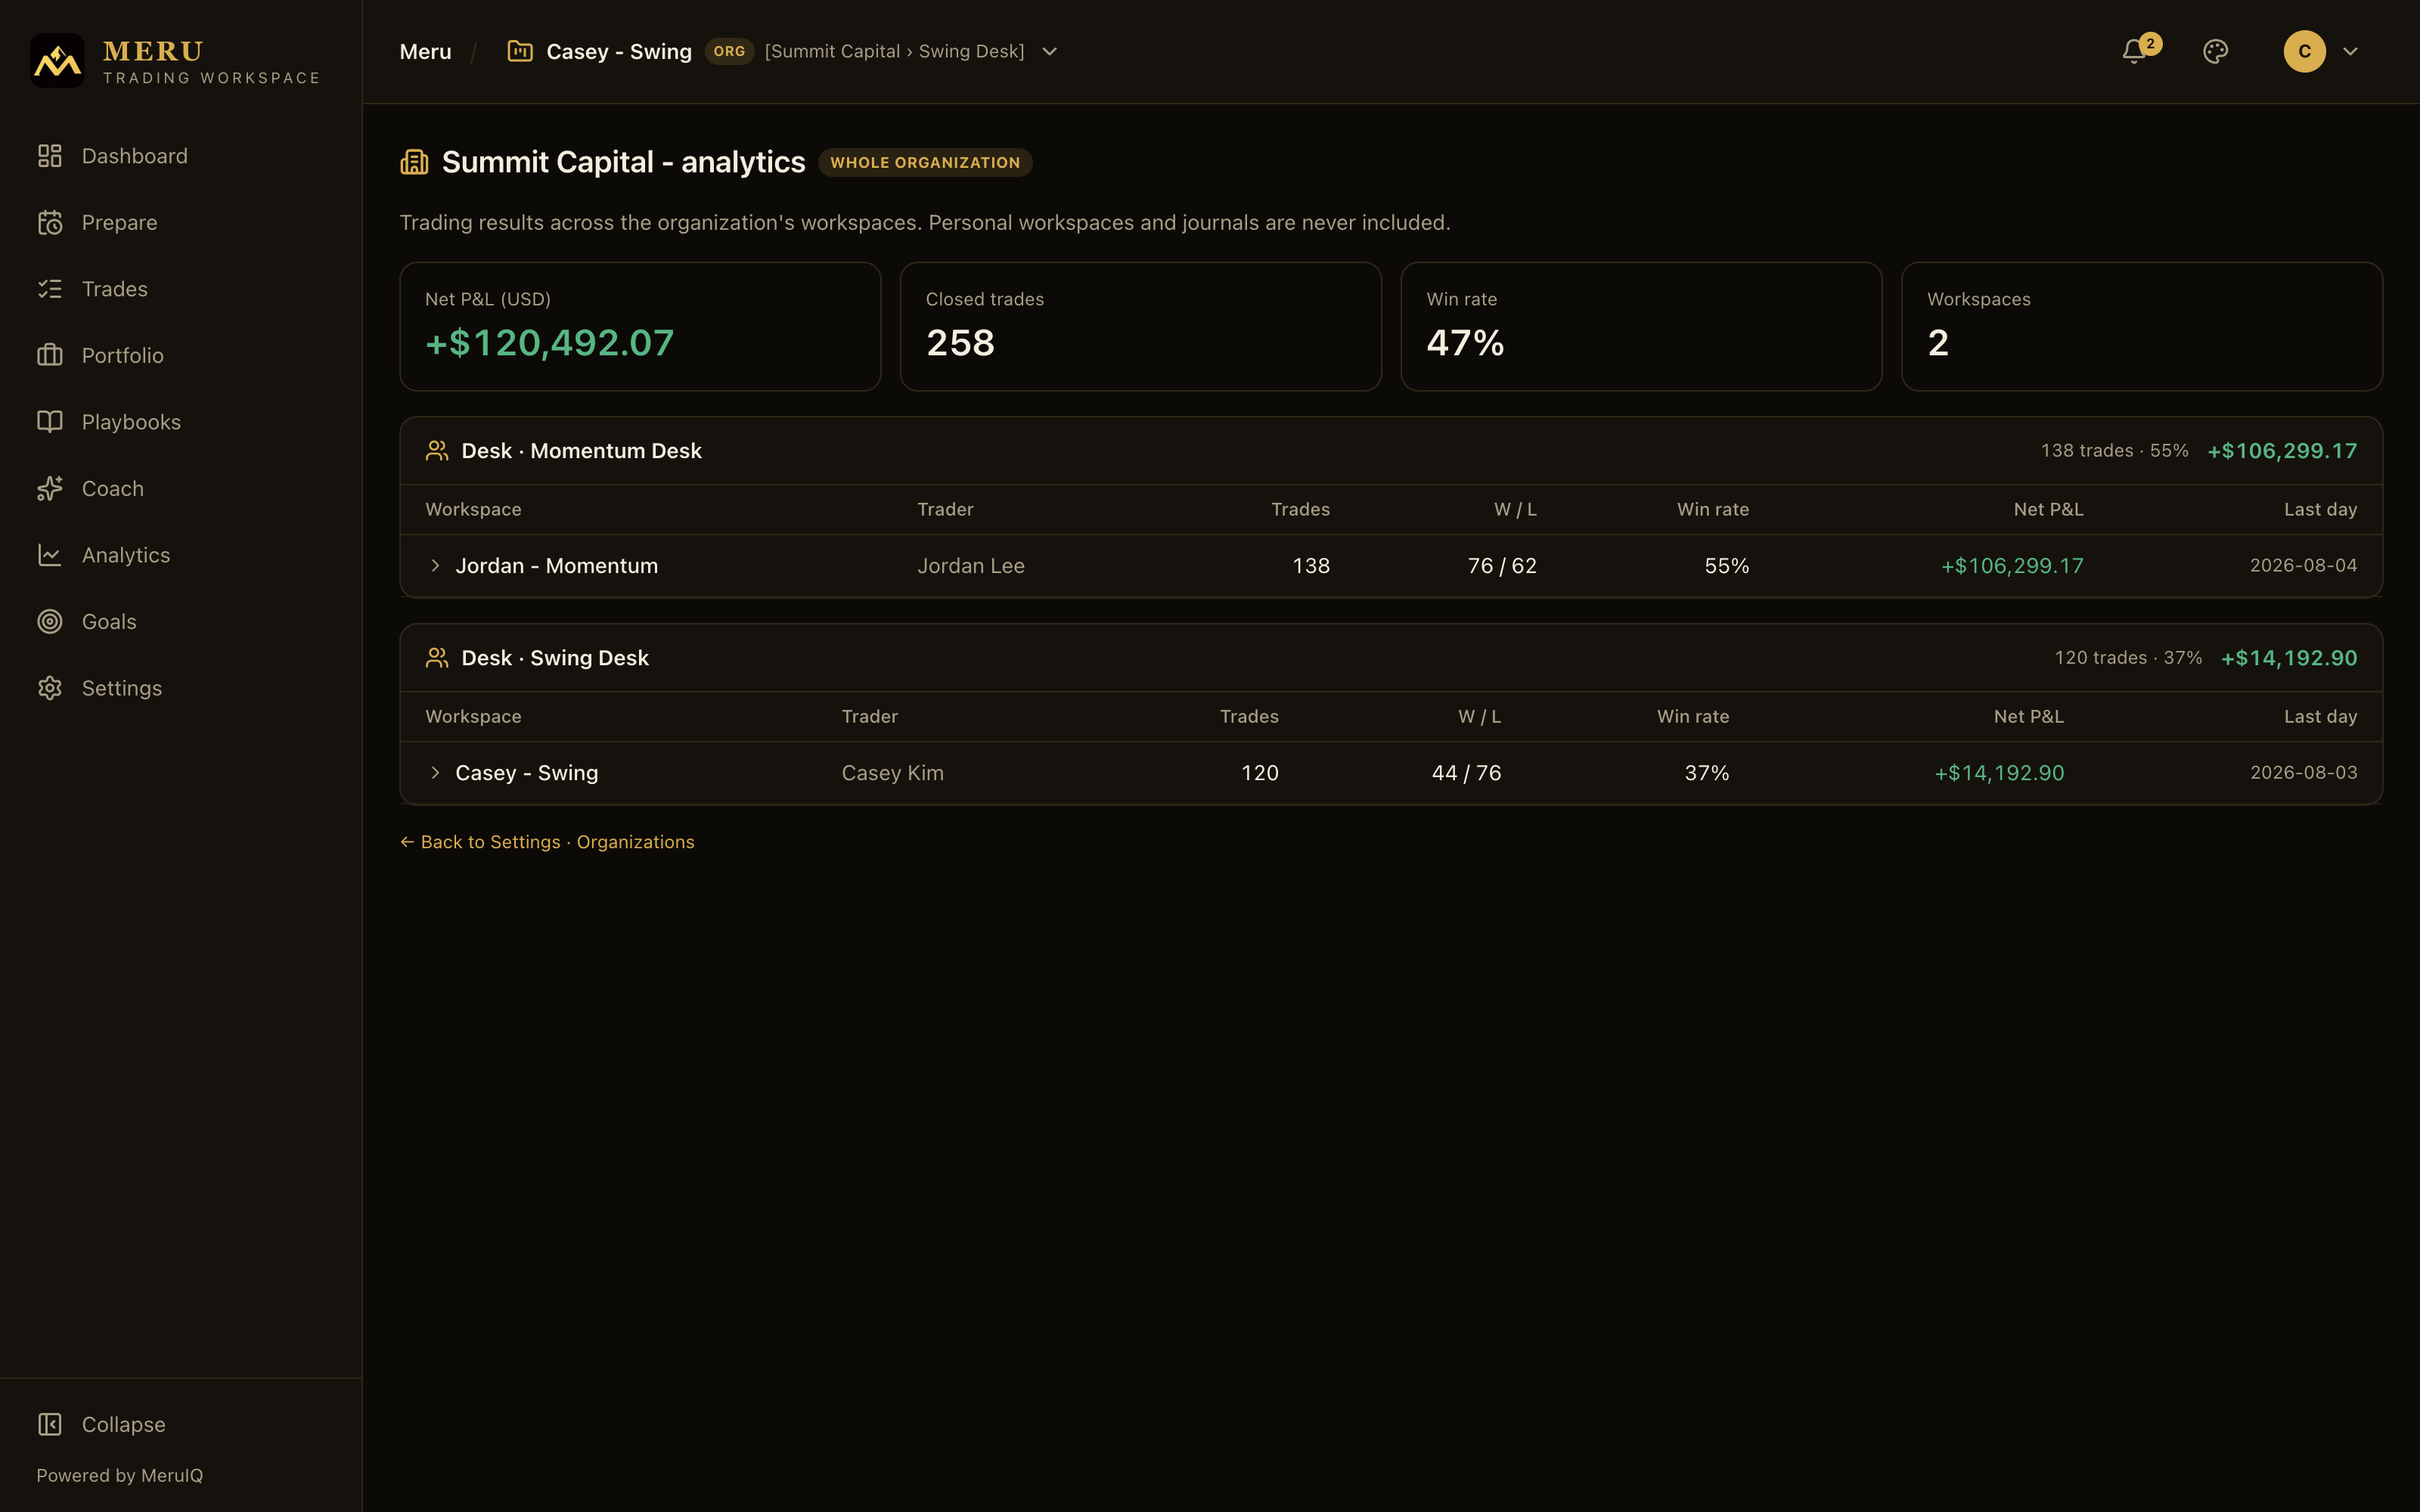
At the top, four tiles summarize the scope: Net P&L (in the dominant currency), Closed trades, Win rate, and Workspaces. Below, workspaces are grouped by desk (undesked books last under No desk), each desk header carrying its own subtotal. Each row is one workspace with columns Workspace, Trader, Trades, W / L, Win rate, Net P&L, and Last day. Click a row to expand it into that book's individual Trades (symbol, side, quantity, entry to exit, P&L, status, opened date) and its Daily results.
Managing the subscription
All subscription changes happen in the same Organization plan & seats section, and the button always narrates the outcome before you click:
- Upgrades (higher tier, more seats, or switching to annual billing) apply right away. You pay a prorated difference for the rest of the current billing period, then the new price per period; switching to annual starts a fresh year that day, with the unused monthly time credited.
- Downgrades (lower tier, fewer seats, or moving from annual back to monthly) are scheduled: the button reads Schedule downgrade with the date. The current plan, seats, and price hold until the period end, then the new configuration starts. While a change is scheduled, a banner spells it out, and re-purchasing the current plan (Keep current plan (cancel change)) cancels it.
- Cancel subscription asks for confirmation, then schedules the end: the plan stays fully active until the period end. After that the organization goes dormant: workbooks become view-only (still readable and exportable), invitations pause, and members and data are kept. A Subscription inactive banner appears, and members relying on the plan are notified.
- Resubscribing from the dormant state reactivates everything as it was: pick a tier and seats and purchase again. Before the period end, Keep my subscription undoes a pending cancellation.
Coverage advisories
If a member already pays for a personal plan that the organization's tier now fully covers, the Workspace says so instead of double-charging them. The member sees a coverage advisory in the Subscription card of their own Settings, headed You're covered by your organization: their organization covers them at its tier, their personal plan is redundant, and a Switch to Base Camp button drops the personal plan from the next renewal while keeping every feature through the org. Coverage lasts while they remain a member; if they later leave, a notification, Your organization coverage ended, prompts them to restore a personal plan. When an admin cancels or schedules a downgrade, members relying on the plan get Organization coverage ending with the date.
Audit lines on shared objects
Because several people can now touch the same book, shared objects carry an audit line: who created the record and when, and who last edited it and when. You'll see it on trades, workspaces (in the rename dialog), and other major records, and manager actions taken on a trader's behalf appear in the trade's timeline. Nobody edits anonymously.